 Installation Instructions Stanacol ® Roof Tile sheets
On this page the text of our installation instructions for the Stanacol ® Tile Sheets. With this we hope to reduce errors during the installation or even prevent errors. For a DIY job tile sheets are suitable. You do not have to be an expert to get our plates installed on the roof. You'll probably need more time with fitting in comparison to an assembly company with experienced staff that is daily installating sheets.
Treatment of the sheets
Working with sheets
Cleaning
Paint
Dimensions
Ventilation
Warm roof
Installation instructions
Under foil
Decking
Daktrim
Montage
Hipped roof
Screws
Valley gutter
Ridge piece
Eaves flashing
Profile fillers and side seal
Accessories
Ridge piece Round
Eave flashing
Trim
Pipe go-trough
Flat sheet
Profile fillers
Retouch paint
Screws
Nails
Introduction
This page contains general information how to install the Nautracom Stanacol ® and Nautracom Stanacol ® Long tile sheets to the roof. The instructions cover normal roof types that are common in the Netherlands. Read the instructions carefully before starting the installation of the tile sheets.
Treatment of the sheets
Under normal circumstances, the tile sheets from Nautracom can be stored one month in the
factory packaging. When the sheets are stored under poor conditions, like rain or frost, or should be kept for more than one month , the package must be opened.
The sheets must then be separated with slats between them, so there is ventilation between the sheets.
Working with sheets
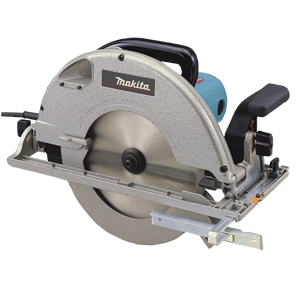
Nautracom tile panels are custom cut delivered. In some cases (pass through or corners) some cutting has to be done on the roof. If the sheets should be cut
always use a nibbler or a special metal blade.
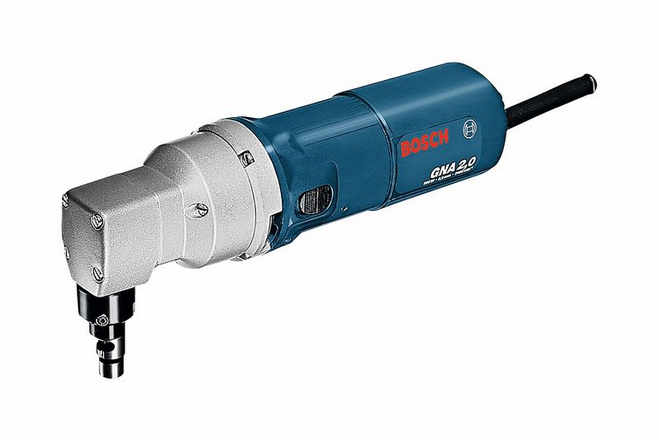
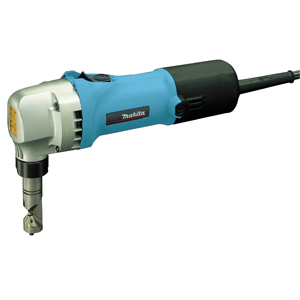
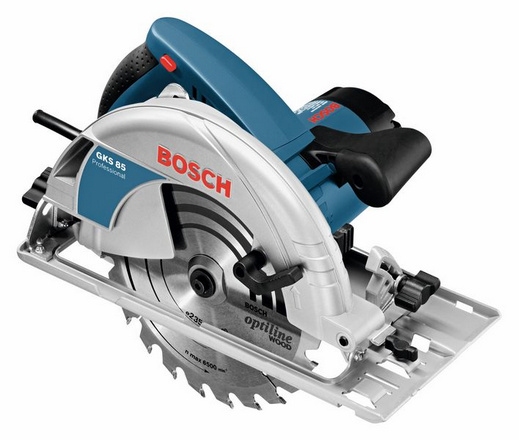
Never cut the sheets with a simple grinder, jig saw or angle grinder, as this will damage the top coating of the sheet and the galvanized layer of the steel sheet gets
removed, so rust in those spots will occur!
Cleaning
Parts and dust from sawing and drilling should be removed from the sheet, because these particles can rust and can damage the surface coating of the sheet.
Dirt that is eventually located on the sheets can simply be hosed away with water. The use of ordinary soaps and detergents is possible. Some aggressive cleaners may
damage the top coating. If in doubt you can always contact us for advice.
Verf
During the assembly you might cause some scratching on the sheets for instance by your tools. The galvanized coating on the sheets will prevent rust.
Scratches can be repaired on the spot by using retouch paint in the same color as the sheets. You can order them with us.
See “accessories”.
Dimensions
Nautracom tile sheets will be delivered at the ordered length. The number of sheets needed for a roof can be calculated by the width of the roof divided by the effective
width of the sheet.
Example: width of roof = 15 meter. Stanacol ® roof tile sheet: effective width 1100 mm.
It means you need for this roof 14 sheets of a certain length. Sometimes yoy will have to cut extra sheet on the sides away when total width of the roof is less than the
total width of the sheets.
If a roof is measured, it is best to lay out the dimensions of graphic paper, so as to facilitate this calculation. If it is not possible to produce a sheet in one
piece, such as 14 meter length, it is necessary to order in two lengths. Consider, especially at a low angled roofs, sufficient overlap so that no water can push up the sheet.
Ventilation
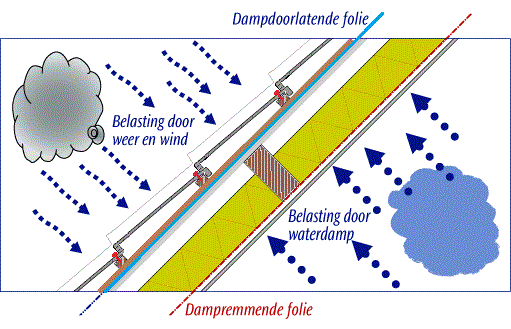
Heat and moisture from the underlying spaces always rises to the roof. This moisture can condense under the roof. Condensation can be prevented by making sure that the
temperature under the roof is the same as the outside. This can be achieved through proper insulation, the assembly of a moisture-proof barrier and proper ventilation.
The space to ventilate should be constructed so that air can flow freely from the gutter to the ridge. Ventilation openings must be at the top of the ridge.
Warm roof
A minimum of 50 mm are left open between the foil and the insulation.
Installation instructions
Under foil
We recommend the use of foil as there is reason to believe that there is insufficient ventilation in the space below the roof. The foil is designed to prevent the
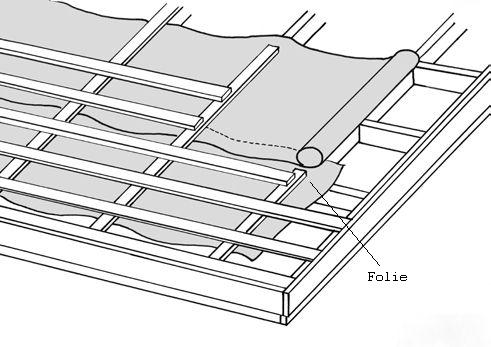
formation of condensation and to prevent moisture from penetrating into the insulation. Start by attaching the foil below the roof near the gutter to the ridge in parallel jobs.
The foil needs overlaps of 200 mm.
A 50 mm opening must be left open between the corner and the batten to make ventilation possible or you should use micro perforated foil. At the end the foil can be folded back till a height of 30 mm and attatched to the eave. A sharp knife is enough to cut the foil. Folding is made easier by using a wooden board.
Decking
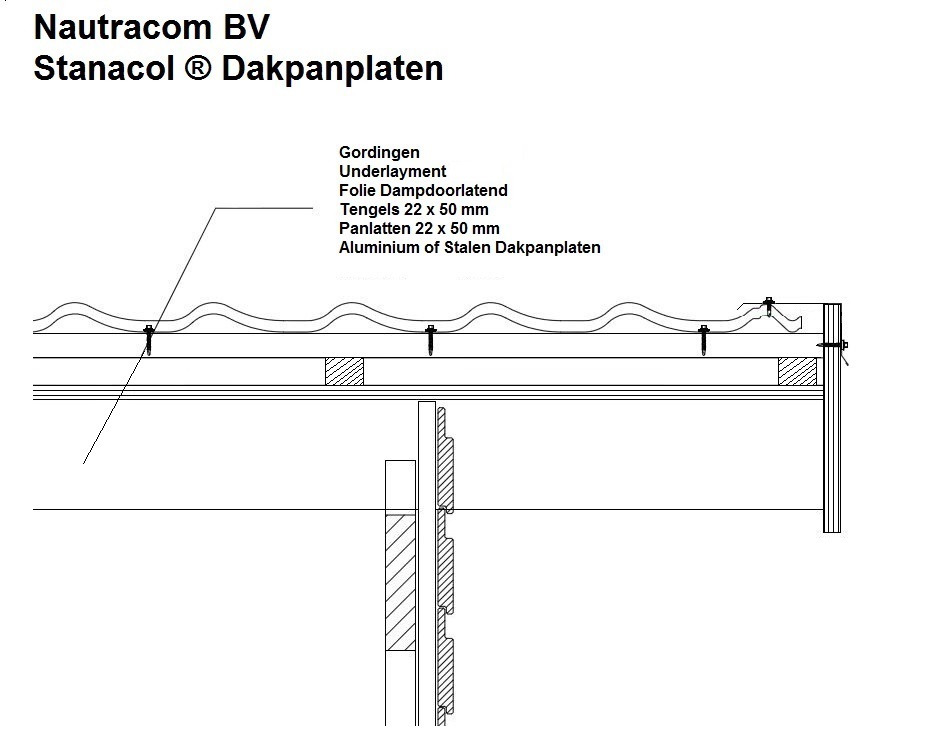
A 22 x 100 cm board is sufficient as decking if the beams are at intervals of 900 mm. If the interval is 1200 mm then you should use a 32x100 cm decking.
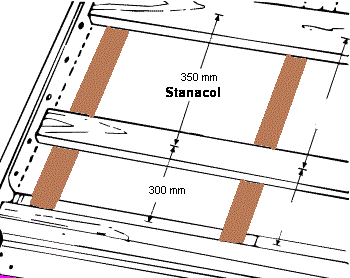
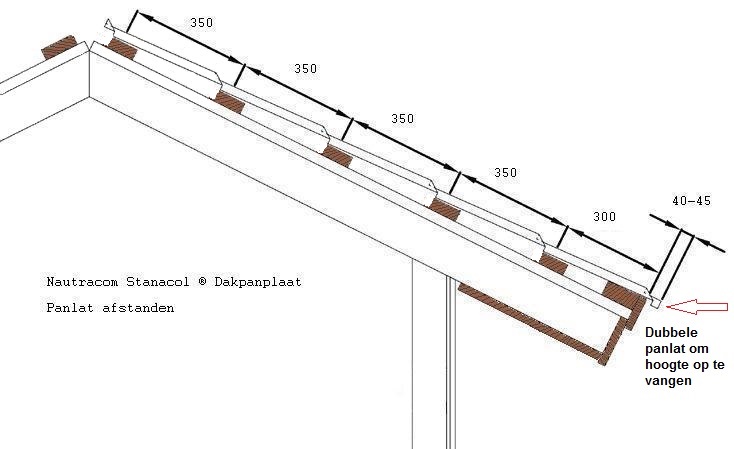
The batten distance:
Nautracom Stanacol ® Roof tile sheet: 350 mm
Nautracom Stanacol ® Long Roof tile sheet: 400 mm
These were calculated once for Scandinavia where there is a higher snow load than in the Netherlands. It is therefore possible, depending on the project, to increase
the distances to the double distance. This depends on the slope of the roof, windload, lenght of the roof, etcetera. Ask us if you doubt!
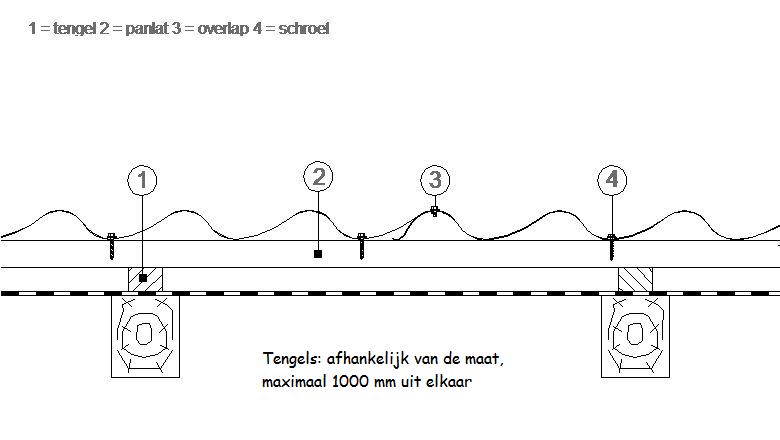
Caution! The bottom batten has a shorter heart to heart distance as the other battens. See drawing above.
The tengels can, depending on the size, be apart between 600 and 1000 mm.
Daktrim
The overhanging eaves Facade Piece is installed before the tile sheet is installed. An overlap of 50 mm is sufficient.
The mount is made to 300 mm with galvanized nails or screws. A nibbler can be used to cut the panels to size.
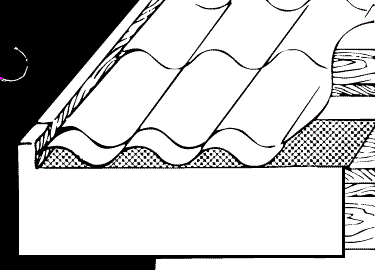
Installation
VERY IMPORTANT:
Stanacol ® and Stanacol ® Long assembly starts from the LEFT side of the roof, looking from the gutter to the ridge. In this way, the built-in "rain gutter" is always
well fitted and there is no problem with the alignment of the sheet. This sounds illogical that one plate is pushed under another, but this way we can keep an eye during the
installation that the sheets fit the transition from one pan to another. These should be as short as possible so the 'hole' is as small as possible.
This prevents rain water to come under the sheet. The integrated rain gutter should prevent water getting over the edge in case some water may come under the sheet overlap.

The installation of the first sheet is very important to the eventual outcome of the total roof. A mistake in the first sheet will further multiply by the roof and will not yield good result. It is therefore recommended to align the first sheet very carefully. The most simple way is to attach a shelf at the underside of the roof at 40 mm distance. When installed properly the roof will show no sawtooth effect. The roof is not always rectangular and a deviation is always possible, especially in older roofs.
Hipped roof
Sheets for a hipped roof should be mounted in either direction from the longest one. Note here that the "rain gutters" get well together. If they are properly
fitted together there will be no movement possible.
Roof slope
Nautracom tile sheets are available in long lengths (sometimes an overlap length is required) and with the built in rain gutter it is possible for all the sheets
to mount on a minimum roof pitch of 8 ° without the sides need to be sealed with some kit.
Screws
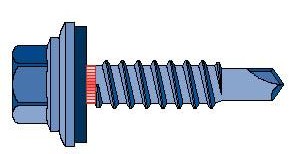
Screws have to be mounted at right angles to the sheets. Using a regular drill and a screw chuck is enough. The screws used are Nautracom self tapping
screw 4.8 * 28 or 4.8 * 35 with a closing ring in EPDM, delivered in the same color as the painted sheets.
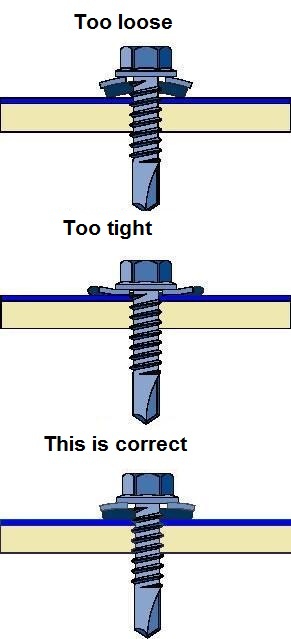
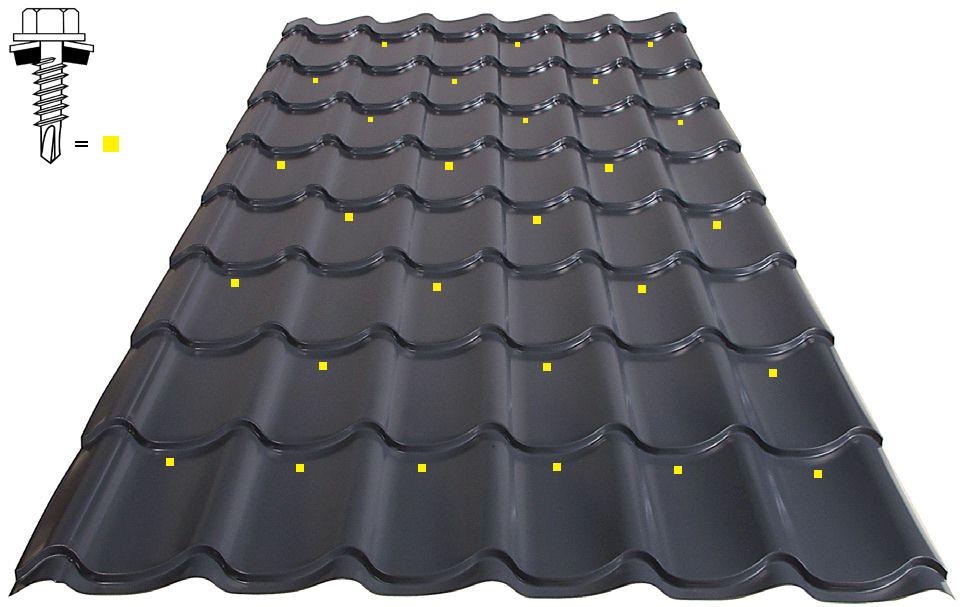
The screws are fixed in the valley of the sheet just below the horizontal line of the tile pressing. At the overlap, the same screws are used.
The number of screws for a proper installation is about 10 to 11 per square meter. This reduces possible noise problems and the chance of ripped off
sheets by storm to a minimum. In addition to this, also calculate enough screws for the installation of the accessories.
Distribution of screws in cross connection:
Valley gutters
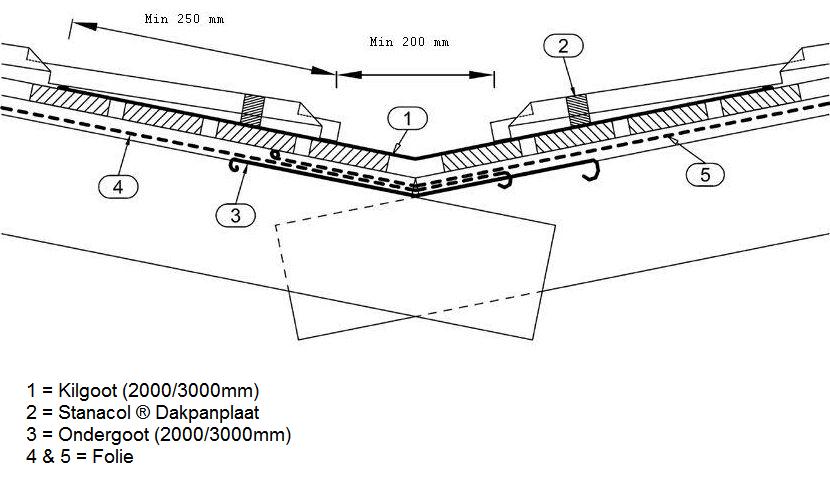
Valley gutters for use on L shaped roofs are made of flat sheet in the same coating and color as the roof tile sheet: Valley gutter.
Think about the proper installation of foil also.
Sketch construction valley gutter:
Pipe go-trough
The pipe go-throughs ) are made of reinforced plastic and profiled in the required form, which facilitates the installation.
For assembling this post refer to the included installation instructions in the package. Nautracom can also provide flat plates in the same coating as the tile sheets
to cover other suppliers accessories. Note: when mounting be sure that the go-through is made waterproof.
Ridge cap
The ridge pieces are available in 3 forms: half round , plane and
flat top with flat ridge. Mounting the ridge pieces occurs after all the tile sheets are installed.
The ridge pieces are also installed with the screws that are used for the sheets. Firmly hold grip of the drilling device when you have to screw in two layers of steel.
For the half round ridge it is possible to order an end cap. This is attached by rivets or screws to the ridge.
Eave flashing
The eave flashing is installed on the side of the roof. When the sheet is properly installed the eaves flashing
will fall down straight on the top of the roof tile sheet.
Walking on the tile sheets
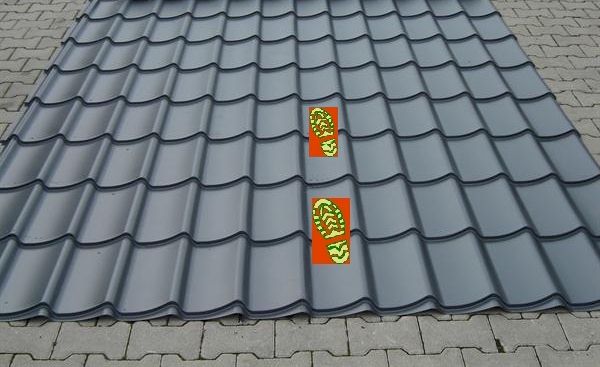
Recurring question in our help desk: Can I walk on the tile panels during assembly or if I want to sweep the chimney?
Yes, that is possible, even without getting dents or scratches in the tile sheets. You will need to put down your feet so as on the following picture.
Only put your feet down at the place where the screws are mounted.
Accessories
Ridge piece half round
Ridge piece half round, end cap.
Length ridge piece: 2000 mm. Effective 1800 mm.
Available in same coating and colours as the roof tile sheets.
Eave flashing
picture
Can be used for all types of roof tile sheet.
Length: 2000 or 3000 mm.
Available in same coating and colours as the roof tile sheets.
Trim
picture
Can be used for all types of roof tile sheet.
Length: 2000 or 3000 mm.
Available in same coating and colours as the roof tile sheets.
Flat sheet
For producing your own model of flashing. Available in same coating and colours as the roof tile sheets.
Standard measure: 2000 x 1250 mm or 3000 x 1250 mm.
Touch up paint
The repair of minor damage or scratches in the tile sheet is possible, there is the possibility to order small bottles of touch up paint.
Nagels
Nails are still available in restricted colours. Use for installation of tile sheets is not recommended.
back
You can use this  button to go back to the page you were before.
last website update: Wednesday, January 6, 2026
No part of this website may in any way be reproduced, adapted, published and / or transferred without the prior written consent of Nautracom B.V. Click here for the full terms of use of this website.
All bids / deliveries made by our Terms and Conditions, filed with the Chamber of Commerce and Industry, Gooi and Eemland, establishment Amersfoort under number 32069290. The valid copy can be found on our Delivery Terms page
